lunes, 26 de febrero de 2024

How To Open ePub Books In Ubuntu Linux

 sudo apt-get install fbreader


Step 1

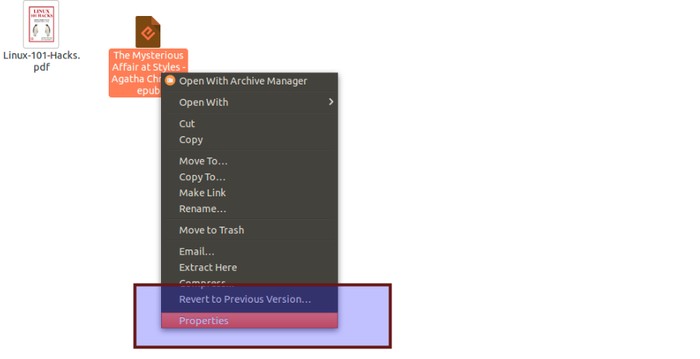
Right click on the ePub file and go to Properties.

ePub properties
Right click and select Properties

Step 2

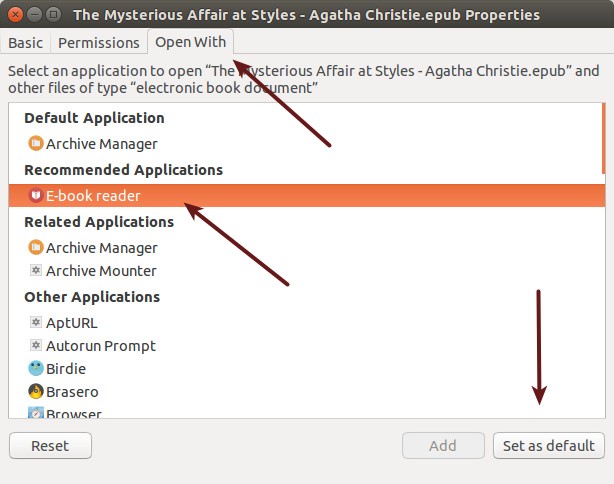
In the Open With tab, you can see that the default application associated with ePub file is Archive Manager. Time to change it. Look for E-Book reader. Select it and click on Set as default button.

Set FBReader default application for ePub


jueves, 8 de febrero de 2024

IP alias and IP route

This command will add the IP address 192.168.174.22 as an alias (eth0:0) to the eth0 interface.


 sudo ifconfig eth0:0 192.168.174.22 netmask 255.255.255.0 up


If you prefer to use the ip command, you can achieve the same with:


sudo ip addr add 192.168.174.22/24 dev eth0


IP route default GW

 sudo ip route add default via 192.168.174.21

jueves, 30 de noviembre de 2023

rsync copying folder

 rsync -av --ignore-existing --update --progress --info=progress2 AdminLTE-3.2.0/ root@104.238.132.200:/opt/docker-lamp/php


lunes, 27 de noviembre de 2023

How to Secure Apache with SSL in Rocky Linux

 Leave a Comment

Business owners should consider website security as one of their top priorities. The security of Websites can be implemented in many ways, and SSL/TLS certificates are a key part. Through these protocols, sensitive information transmitted between clients and servers is encrypted to prevent unauthorized access.

This article shows step-by-step instructions on how to install an SSL certificate on a website. Using this guide will ensure that your web server is secure, so your customers and users can feel comfortable when visiting your website.

Here are some of the advantages of using SSL certificates:

* Protection of sensitive information / Data encryption

* Improved trust and credibility:

* Better search engine rankings:

* Protection against phishing attacks:

* Compliance with regulations:

Prerequisites :

Operating System       :    Rocky Linux / RHEL /CentOS /Fedora
Packages & Dependencies:    mod_ssl,epel-release, certbot & python3-certbot-apache
User account           :    root user or user account with sudo privileges
Recommended to run all the administrative commands as with sudo privilege instead of root.

Difficulties in setting up sudo users? Click here to find the steps.

Below is a checklist of things to do before installing Apache's SSL certificate on Rocky Linux

1. Ensure that the Apache Server is properly installed and running.

2. Your server should be accessible over the internet with a valid domain name.

3. Make sure your domain name points to the correct IP address on your server.

4. Ensure your Apache server has a virtual host configured for the domain name you      wish to secure.

5. Check your firewall settings to see if they allow incoming connections on ports 80      (HTTP) and 443 (HTTPS).

Click here for instructions on configuring an Apache virtual host under Rocky Linux to accommodate multiple websites. You can also find more information about implementing LAMP stack on Rocky Linux here.

This section assumes you have all the above things configured and are ready to install SSL on your server.

My Lab Setup :

Apache Server:

Operating System    :   Rocky Linux release 9.1 (Blue Onyx)
Hostname            :   apache.linuxteck
IP Address          :   54.236.17.69
Table of Contents  show 
Step 1: Install Certbot

Note:

To begin, install the Certbot package. It is a free, open-source program that manages SSL/TLS certificates for Web Servers automatically. The Electronic Frontier Foundation (EFF) has developed this project in order to simplify the process of obtaining and renewing SSL/TLS certificates.

There are many web servers that Certbot supports, such as Apache, Nginx, and others. To communicate with the Certificate Authority (CA) and obtain SSL/TLS certificates, it uses the Automated Certificate Management Environment (ACME) protocol.

In addition to automating certificate management, Certbot also validates and installs SSL/TLS certificates. Furthermore, it is capable of automatically renewing certificates before they expire, which ensures that websites and applications remain safe until they expire. The Certbot tool is available for Linux, macOS, and Windows and is widely used by web developers and system administrators.

The Certbot Package is not included in Rocky Linux's base repository by default. In order to obtain it, we must install the EPEL (Extra Packages for Enterprise Linux) repository. This repository provides additional software packages through open-source efforts. Besides certbot, we must also install "mod_ssl," which is a security module for Apache to support SSL/TLS protocols.

$ sudo dnf install epel-release


$ sudo dnf install mod_ssl

Install-EPEL-Repo-in-Rocky-Linux

Install-mod_ssl-in-Rocky-Linux

You can now install the Certbot package and its dependencies for Rocky Linux with the following command

$ sudo dnf install certbot python3-certbot-apache

Install-Certbot-with-dnf-command-rocky-linux

Step 2: Install SSL Certificate for Apache httpd

Note:

Upon completion of the installation, you will be able to get a Let's Encrypt SSL certificate. Certbot offers various methods for obtaining an SSL Certificate, you may use one of the following commands.

a. Simple method: certbot --apache

b. Alternately, you can use the "-d" flag with this command directly to specify multiple domains: certbot --apache -d website.com

In this demo we will proceed with a simple method

$ sudo certbot --apache

Note:

When you run the above command, you will be prompted for a series of questions which you must answer in order to deploy the certificate successfully. In order to make things easier for beginners, I have separated each prompt into different boxes.

[linuxteck@linuxteck ~]$ sudo certbot --apache
Saving debug log to /var/log/letsencrypt/letsencrypt.log

In order to verify the certificate, Let's Encrypt it will ask you to enter your email address:

Enter email address (used for urgent renewal and security notices)
 (Enter 'c' to cancel): john@linuxteck.com  

Please accept the following terms and conditions:

- - - - - - - - - - - - - - - - - - - - - - - - - - - - - - - - - - - - - - - -
Please read the Terms of Service at
https://letsencrypt.org/documents/LE-SA-v1.3-September-21-2022.pdf. You must
agree in order to register with the ACME server. Do you agree?
- - - - - - - - - - - - - - - - - - - - - - - - - - - - - - - - - - - - - - - -
(Y)es/(N)o: Y  

After your first certificate is issued, you will be asked to share your email address to receive updates on new/campaigns with the Electronic Frontier Foundation. The decision is yours to make "Y or N" :

- - - - - - - - - - - - - - - - - - - - - - - - - - - - - - - - - - - - - - - -
Would you be willing, once your first certificate is successfully issued, to
share your email address with the Electronic Frontier Foundation, a founding
partner of the Let's Encrypt project and the non-profit organization that
develops Certbot? We'd like to send you email about our work encrypting the web,
EFF news, campaigns, and ways to support digital freedom.
- - - - - - - - - - - - - - - - - - - - - - - - - - - - - - - - - - - - - - - -
(Y)es/(N)o:  Y  
Account registered.

Depending on your web server configuration, it will list your domains and ask which one you want to activate HTTPS for. You can select '1' or '2'. However, if you want all domains to begin using HTTPS, press ENTER:

Which names would you like to activate HTTPS for?
We recommend selecting either all domains, or all domains in a VirtualHost/server block.
- - - - - - - - - - - - - - - - - - - - - - - - - - - - - - - - - - - - - - - -
1: linuxteck-vhost.net
2: www.linuxteck-vhost.net
- - - - - - - - - - - - - - - - - - - - - - - - - - - - - - - - - - - - - - - -
Select the appropriate numbers separated by commas and/or spaces, or leave input
blank to select all options shown (Enter 'c' to cancel):  simply press ENTER to enable HTTPS to all the domains
Requesting a certificate for linuxteck-vhost.net and www.linuxteck-vhost.net

Successfully received certificate.
Certificate is saved at: /etc/letsencrypt/live/linuxteck-vhost.net/fullchain.pem
Key is saved at: /etc/letsencrypt/live/linuxteck-vhost.net/privkey.pem
This certificate expires on 2023-06-30.
These files will be updated when the certificate renews.
Cerbot has set up scheduled task to automatically renew this certificate in the background.

Here is the output you will see after a successful installation:

Deploying certificate
Successfully depoloyed certificate for linuxteck-vhost.net to /etc/httpd/conf.d/linuxteck-vhost.net-le-ssl.conf
Successfully depoloyed certificate for www.linuxteck-vhost.net to /etc/httpd/conf.d/linuxteck-vhost.net-le-ssl.conf
Congratulations! You have successfully enabled HTTPS on https://linuxteck-vhost.net and https://www.linuxteck-vhost.net
blank to select all options shown (Enter 'c' to cancel):  simply press ENTER to enable HTTPS to all the domains
Requesting a certificate for linuxteck-vhost.net and www.linuxteck-vhost.net
Step 3: Test Apache SSL Let's Encrypt certificate

Note:

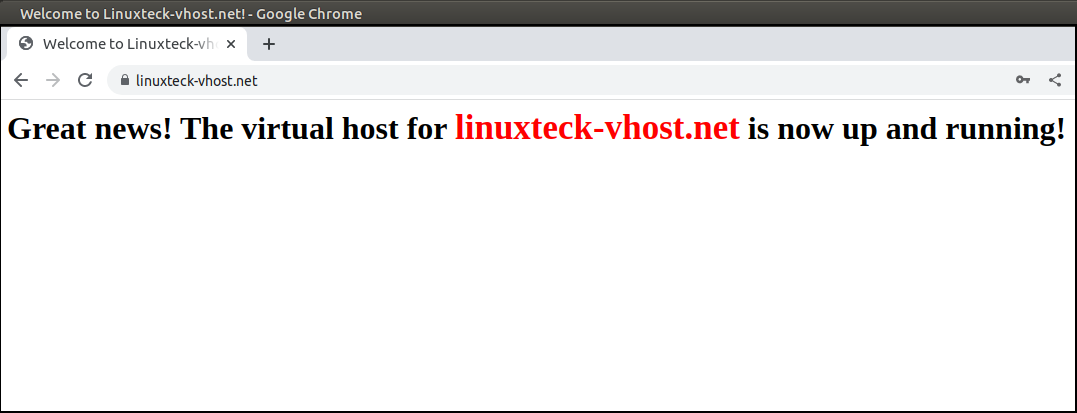
To find out if HTTPS has been enabled on your site, enter the URL and hit enter. A padlock will appear at the beginning of the URL if HTTPS has been enabled on your site.

enable ssl for apache

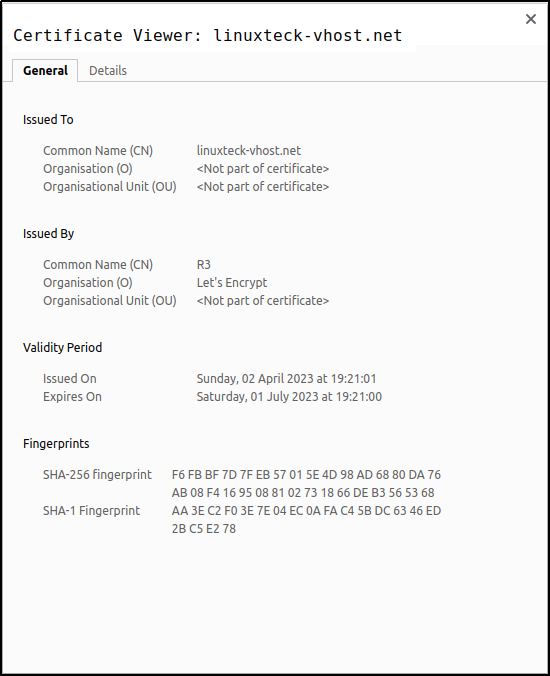
You can get more details by clicking on the padlock icon and selecting the 'Certificate is valid' option.

apache secure

View-Apache-SSL-Certificate-Info

Step 4: Certificate Automatic Renewal

Note:

Let's Encrypt certificates are generally valid for 90 days, so you need to renew them manually after that time. The following command needs to be run to renew the certificate.

$ sudo certbot renew --dry-run

However, we can automate the renewal process using cron jobs. In your crontab file, add the following entry:

0 0 * * * /usr/bin/certbot renew
Step 5: Delete Certificate

If you wish to delete the certificate, use the following command:

$ sudo certbot delete

Conclusion:

We hope this article has helped you understand how to Secure Apache with SSL in Rocky Linux 9.1 step by step. You can also get help from Let's Encrypt's community site if you encounter any issues. Drop me your feedback/comments. Feel free to share this article with others if you like it. 

https://www.linuxteck.com/secure-apache-with-ssl-in-rocky-linux/#google_vignette

viernes, 17 de noviembre de 2023

How To Install and Use Docker Compose on Rocky Linux 8


How To Install and Use Docker Compose on Rocky Linux 8

Published on September 13, 2022
How To Install and Use Docker Compose on Rocky Linux 8
Not using Rocky Linux 8?Choose a different version or distribution.
Rocky Linux 8

Introduction

Docker simplifies the process of managing application processes in containers. While containers are similar to virtual machines in certain ways, they are more lightweight and resource-friendly. This allows developers to break down an application environment into multiple isolated services.

For applications depending on several services, orchestrating all the containers to start up, communicate, and shut down together can quickly become unwieldy. Docker Compose is a tool that allows you to run multi-container application environments based on definitions set in a YAML file. It uses service definitions to build fully customizable environments with multiple containers that can share networks and data volumes.

In this guide, you’ll demonstrate how to install Docker Compose on a Rocky Linux 8 server and how to get started using this tool.

Prerequisites

To follow this article, you will need:

Step 1 — Installing Docker Compose

To make sure you obtain the most updated stable version of Docker Compose, you’ll download this software from the official Docker repository.

First, let’s update the package database:

  1. sudo dnf check-update

Next, add the official Docker repository if you didn’t do so during your Docker install:

  1. sudo dnf config-manager --add-repo https://download.docker.com/linux/centos/docker-ce.repo

While there is no Rocky Linux specific repository from Docker, Rocky Linux is based upon CentOS and can use the same repository. Now you can install Docker Compose, which is a plugin for Docker:

  1. sudo dnf install docker-compose-plugin

To verify that the installation was successful, you can run:

  1. docker compose version

You’ll see output similar to this:

Output
Docker Compose version v2.10.2

Docker Compose is now successfully installed on your system. In the next section, you’ll see how to set up a docker-compose.yml file and get a containerized environment up and running with this tool.

Step 2 — Setting Up a docker-compose.yml File

To demonstrate how to set up a docker-compose.yml file and work with Docker Compose, you’ll create a web server environment using the official Nginx image from Docker Hub, the public Docker registry. This containerized environment will serve a single static HTML file.

Start off by creating a new directory in your home folder, and then moving into it:

  1. mkdir ~/compose-demo
  2. cd ~/compose-demo

In this directory, set up an application folder to serve as the document root for your Nginx environment:

  1. mkdir app

Using your preferred text editor, create a new index.html file within the app folder:

  1. nano app/index.html

Place the following content into this file:

~/compose-demo/app/index.html
<!doctype html>
<html lang="en">
<head>
    <meta charset="utf-8">
    <title>Docker Compose Demo</title>
    <link rel="stylesheet" href="https://cdn.jsdelivr.net/gh/kognise/water.css@latest/dist/dark.min.css">
</head>
<body>

    <h1>This is a Docker Compose Demo Page.</h1>
    <p>This content is being served by an Nginx container.</p>

</body>
</html>

Save and close the file when you’re done. If you are using nano, you can do that by typing CTRL+X, then Y and ENTER to confirm.

Next, create the docker-compose.yml file:

  1. nano docker-compose.yml

Insert the following content in your docker-compose.yml file:

docker-compose.yml
version: '3.7'
services:
  web:
    image: nginx:alpine
    ports:
      - "8000:80"
    volumes:
      - ./app:/usr/share/nginx/html

The docker-compose.yml file typically starts off with the version definition. This will tell Docker Compose which configuration version you’re using.

You then have the services block, where you set up the services that are part of this environment. In your case, you have a single service called web. This service uses the nginx:alpine image and sets up a port redirection with the ports directive. All requests on port 8000 of the host machine (the system from where you’re running Docker Compose) will be redirected to the web container on port 80, where Nginx will be running.

The volumes directive will create a shared volume between the host machine and the container. This will share the local app folder with the container, and the volume will be located at /usr/share/nginx/html inside the container, which will then overwrite the default document root for Nginx.

Save and close the file.

You have set up a demo page and a docker-compose.yml file to create a containerized web server environment that will serve it. In the next step, you’ll bring this environment up with Docker Compose.

Step 3 — Running Docker Compose

With the docker-compose.yml file in place, you can now execute Docker Compose to bring your environment up. The following command will download the necessary Docker images, create a container for the web service, and run the containerized environment in background mode:

  1. docker compose up -d

Docker Compose will first look for the defined image on your local system, and if it can’t locate the image it will download the image from Docker Hub. You’ll see output like this:

Output
Creating network "compose-demo_default" with the default driver Pulling web (nginx:alpine)... alpine: Pulling from library/nginx cbdbe7a5bc2a: Pull complete 10c113fb0c77: Pull complete 9ba64393807b: Pull complete c829a9c40ab2: Pull complete 61d685417b2f: Pull complete Digest: sha256:57254039c6313fe8c53f1acbf15657ec9616a813397b74b063e32443427c5502 Status: Downloaded newer image for nginx:alpine Creating compose-demo_web_1 ... done

Note: If you run into a permission error regarding the Docker socket, this means you skipped Step 2 of How To Install and Use Docker on Rocky Linux 8. Going back and completing that step will enable permissions to run docker commands without sudo.

Your environment is now up and running in the background. To verify that the container is active, you can run:

  1. docker compose ps

This command will show you information about the running containers and their state, as well as any port redirections currently in place:

Output
Name Command State Ports ---------------------------------------------------------------------------------- compose-demo_web_1 /docker-entrypoint.sh ngin ... Up 0.0.0.0:8000->80/tcp

You can now access the demo application by pointing your browser to either localhost:8000 if you are running this demo on your local machine, or your_server_domain_or_IP:8000 if you are running this demo on a remote server.

You’ll see a page like this:

Docker Compose Demo Page

The shared volume you’ve set up within the docker-compose.yml file keeps your app folder files in sync with the container’s document root. If you make any changes to the index.html file, they will be automatically picked up by the container and thus reflected on your browser when you reload the page.

In the next step, you’ll see how to manage your containerized environment with Docker Compose commands.

Step 4 — Getting Familiar with Docker Compose Commands

You’ve seen how to set up a docker-compose.yml file and bring your environment up with docker compose up. You’ll now see how to use Docker Compose commands to manage and interact with your containerized environment.

To check the logs produced by your Nginx container, you can use the logs command:

  1. docker compose logs

You’ll see output similar to this:

Output
Attaching to compose-demo_web_1 web_1 | /docker-entrypoint.sh: /docker-entrypoint.d/ is not empty, will attempt to perform configuration web_1 | /docker-entrypoint.sh: Looking for shell scripts in /docker-entrypoint.d/ web_1 | /docker-entrypoint.sh: Launching /docker-entrypoint.d/10-listen-on-ipv6-by-default.sh web_1 | 10-listen-on-ipv6-by-default.sh: Getting the checksum of /etc/nginx/conf.d/default.conf web_1 | 10-listen-on-ipv6-by-default.sh: Enabled listen on IPv6 in /etc/nginx/conf.d/default.conf web_1 | /docker-entrypoint.sh: Launching /docker-entrypoint.d/20-envsubst-on-templates.sh web_1 | /docker-entrypoint.sh: Configuration complete; ready for start up web_1 | 172.22.0.1 - - [02/Jun/2020:10:47:13 +0000] "GET / HTTP/1.1" 200 353 "-" "Mozilla/5.0 (X11; Linux x86_64) AppleWebKit/537.36 (KHTML, like Gecko) Chrome/83.0.4103.61 Safari/537.36" "-"

If you want to pause the environment execution without changing the current state of your containers, you can use:

  1. docker compose pause
Output
Pausing compose-demo_web_1 ... done

To resume execution after issuing a pause:

  1. docker compose unpause
Output
Unpausing compose-demo_web_1 ... done

The stop command will terminate the container execution, but it won’t destroy any data associated with your containers:

  1. docker compose stop
Output
Stopping compose-demo_web_1 ... done

If you want to remove the containers, networks, and volumes associated with this containerized environment, use the down command:

  1. docker compose down
Output
Removing compose-demo_web_1 ... done Removing network compose-demo_default

Notice that this won’t remove the base image used by Docker Compose to spin up your environment (in your case, nginx:alpine). This way, whenever you bring your environment up again with a docker compose up, the process will be much faster since the image is already on your system.

In case you want to also remove the base image from your system, you can use:

  1. docker image rm nginx:alpine
Output
Untagged: nginx:alpine Untagged: nginx@sha256:b89a6ccbda39576ad23fd079978c967cecc6b170db6e7ff8a769bf2259a71912 Deleted: sha256:7d0cdcc60a96a5124763fddf5d534d058ad7d0d8d4c3b8be2aefedf4267d0270 Deleted: sha256:05a0eaca15d731e0029a7604ef54f0dda3b736d4e987e6ac87b91ac7aac03ab1 Deleted: sha256:c6bbc4bdac396583641cb44cd35126b2c195be8fe1ac5e6c577c14752bbe9157 Deleted: sha256:35789b1e1a362b0da8392ca7d5759ef08b9a6b7141cc1521570f984dc7905eb6 Deleted: sha256:a3efaa65ec344c882fe5d543a392a54c4ceacd1efd91662d06964211b1be4c08 Deleted: sha256:3e207b409db364b595ba862cdc12be96dcdad8e36c59a03b7b3b61c946a5741a

Note: Please refer to our guide on How to Install and Use Docker for a more detailed reference on Docker commands.

Conclusion

In this guide, you’ve seen how to install Docker Compose and set up a containerized environment based on an Nginx web server image. You’ve also seen how to manage this environment using Compose commands.

For a complete reference of all available docker compose commands, check the official documentation.