Mostrando entradas con la etiqueta Disk partion. Mostrar todas las entradas

miércoles, 5 de abril de 2023

Increase part space on FreePBX and Digital Ocean

 yum install cloud-utils-growpart -y

Loaded plugins: fastestmirror
Loading mirror speeds from cached hostfile
* base: centos.excellmedia.net
* epel: epel.mirror.angkasa.id
* extras: centos.excellmedia.net
* updates: centos.excellmedia.net
Resolving Dependencies
--> Running transaction check
---> Package cloud-utils-growpart.noarch 0:0.29-5.el7 will be installed
--> Finished Dependency Resolution

Dependencies Resolved

========================================================================================================================================================================
Package Arch Version Repository Size
========================================================================================================================================================================
Installing:
cloud-utils-growpart noarch 0.29-5.el7 base 27 k

Transaction Summary
========================================================================================================================================================================
Install 1 Package

Total download size: 27 k
Installed size: 61 k
Downloading packages:
cloud-utils-growpart-0.29-5.el7.noarch.rpm | 27 kB 00:00:00
Running transaction check
Running transaction test
Transaction test succeeded
Running transaction
Installing : cloud-utils-growpart-0.29-5.el7.noarch 1/1
Verifying : cloud-utils-growpart-0.29-5.el7.noarch 1/1

Installed:
cloud-utils-growpart.noarch 0:0.29-5.el7

Complete!

NOTE:

Please note that growpart utility is available from EPEL Repository so before installing growpart package you need to make sure EPEL repo is installed and enabled. You can check more about this on How to Install and Enable EPEL Repository on RHEL/CentOS 7/8

Step 4: Install Growpart Command in Linux Using RPM Utility

The second way that you can use is by installing through rpm package. In this case you need to first download the appropriate rpm version of growpart tool and then install it by using rpm -ivh cloud-utils-growpart-0.29-5.el7.noarch.rpm command as shown below.

[root@localhost ~]# rpm -ivh cloud-utils-growpart-0.29-5.el7.noarch.rpm
Preparing... ################################# [100%]
Updating / installing...
1:cloud-utils-growpart-0.29-5.el7 ################################# [100%]

Step 5: Resize root partition Using Growpart Command in Linux

Once it is installed you can now go ahead and resize the root partition. As you can see in below output root partition currently lies on /dev/sda disk so we need to resize the /dev/sda2 partition.

[root@localhost ~]# lsblk
NAME MAJ:MIN RM SIZE RO TYPE MOUNTPOINT
fd0 2:0 1 4K 0 disk
sda 8:0 0 500G 0 disk
├─sda1 8:1 0 1G 0 part /boot
└─sda2 8:2 0 499G 0 part
├─centos_ymr--hrm--01-root 253:0 0 50G 0 lvm /
├─centos_ymr--hrm--01-swap 253:1 0 15.8G 0 lvm [SWAP]
└─centos_ymr--hrm--01-home 253:2 0 433.2G 0 lvm /home
sdb 8:16 0 1T 0 disk
sr0 11:0 1 1024M 0 rom
growpart /dev/vda 1
    xfs_growfs /dev/vda1
    df -h


https://www.cyberithub.com/install-growpart-command-resize-root-partition-in-linux-rhel-centos-7-8/

https://docs.digitalocean.com/products/droplets/how-to/resize/

martes, 7 de marzo de 2023

How to Format Disk Partitions in Linux

 Introduction

A disk partition must be formatted and mounted before use. The formatting process can also be done for several other reasons, such as changing the file system, fixing errors, or deleting all data.

In this tutorial, you will learn how to format and mount disk partitions in Linux using ext4, FAT32, or NTFS file system.

How to Format Disk Partitions in Linux

Prerequisites

  • A system running Linux
  • A user account with sudo or root privileges
  • Access to a terminal window / command line (Activities > Search > Terminal)

Checking the Partitions

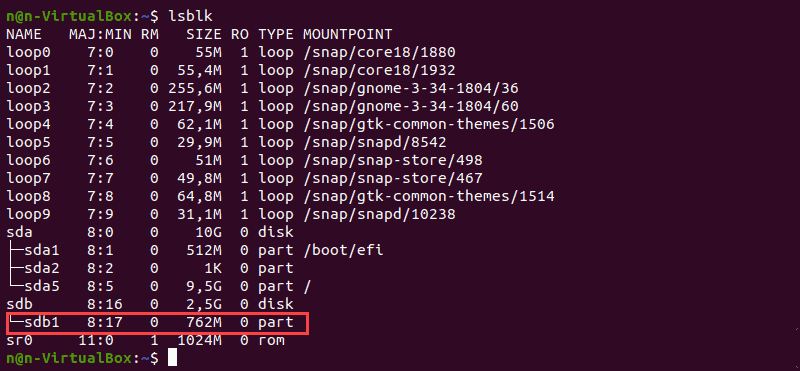
Before formatting, locate a partition you wish to format. To do so, run the lsblk command that displays block devices. Block devices are files that represent devices such as hard drives, RAM disks, USB drives, and CD/ROM drives.

lsblk

The terminal prints out a list of all block devices as well as information about them:

  • NAME – Device names
  • MAJ:MIN – Major or minor device numbers
  • RM – Whether the device is removable (1 if yes, 0 if no)
  • SIZE – The size of the device
  • RO – Whether the device is read-only
  • TYPE – The type of the device
  • MOUNTPOINT – Device’s mount point

We will use the /dev/sdb1 partition as an example.

Locating partitions with lsblk command.

The lsblk command without additional options does not display information about the devices’ file systems.

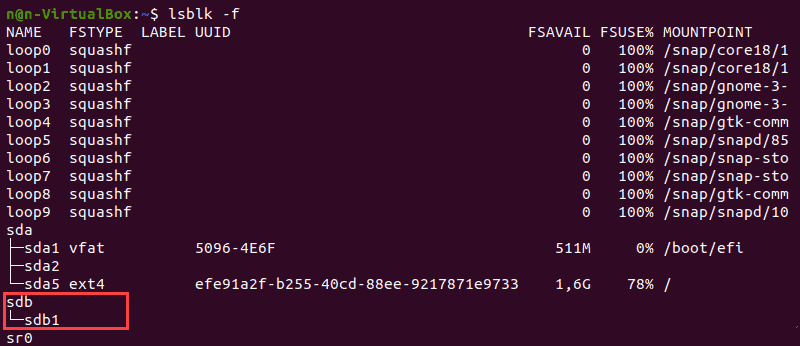
To display a list containing file system information, add the -f option:

lsblk -f

The terminal prints out the list of all block devices. The partitions that do not contain information on the file system in use are non-formatted partitions.

Locating non-formatted partitions with lsblk -f command.

Note: Consider learning how to create partitions in Linux.

Formatting Disk Partition in Linux

There are three ways to format disk partitions using the mkfs command, depending on the file system type:

  • ext4
  • FAT32
  • NTFS

The general syntax for formatting disk partitions in Linux is:

mkfs [options] [-t type fs-options] device [size]

Formatting Disk Partition with ext4 File System

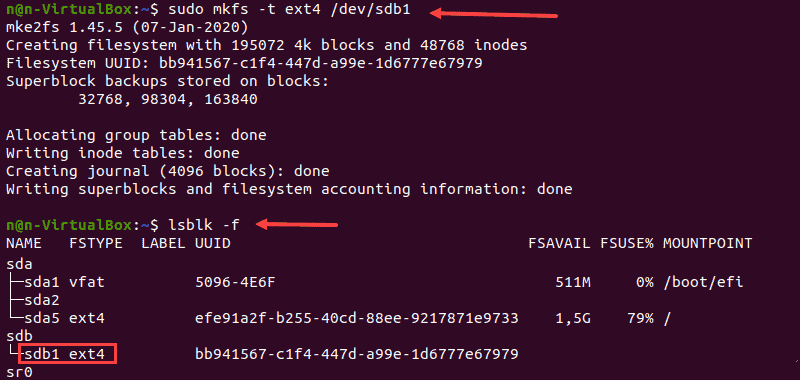
1. Format a disk partition with the ext4 file system using the following command:

sudo mkfs -t ext4 /dev/sdb1

2. Next, verify the file system change using the command:

lsblk -f

The terminal prints out a list of block devices.

3. Locate the preferred partition and confirm that it uses the ext4 file system.

The process of formatting disk partition using the ext4 file system in Linux.

Formatting Disk Partition with FAT32 File System

1. To format a disk with a FAT32 file system, use:

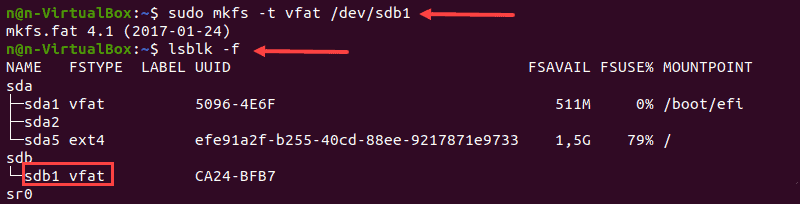
sudo mkfs -t vfat /dev/sdb1

2. Again, run the lsblk command to verify the file system change and locate the preferred partition from the list.

lsblk -f

The expected output is:

Formatting disk partition using FAT32 file system in Linux.

Formatting Disk Partition with NTFS File System

1. Run the mkfs command and specify the NTFS file system to format a disk:

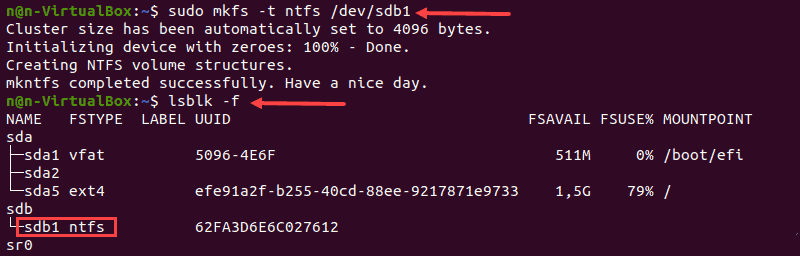
sudo mkfs -t ntfs /dev/sdb1

The terminal prints a confirmation message when the formatting process completes.

2. Next, verify the file system change using:

lsblk -f

3. Locate the preferred partition and confirm that it uses the NFTS file system.

Formatting a partition with NTFS file system in Linux.

Mounting the Disk Partition in Linux

Before using the disk, create a mount point and mount the partition to it. A mount point is a directory used to access data stored in disks.

1. Create a mount point by entering:

sudo mkdir -p [mountpoint]

2. After that, mount the partition by using the following command:

sudo mount -t auto /dev/sdb1 [mountpoint]

Note: Replace [mountpoint] with the preferred mount point (example:/usr/media).

There is no output if the process completes successfully.

The process of creating mount point and mounting.

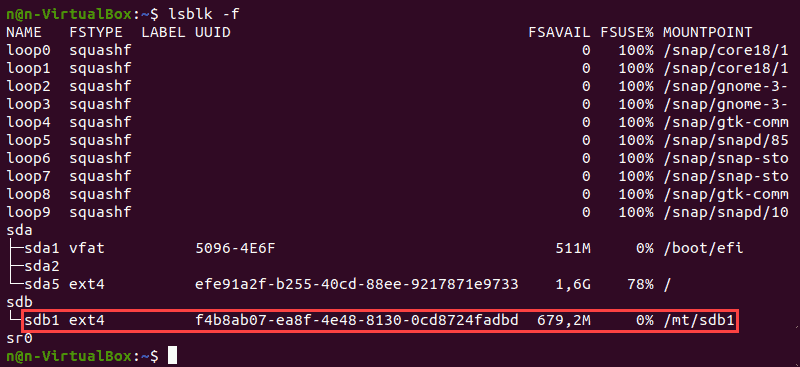
3. Verify if the partition is mounted using the following command:

lsblk -f

The expected output is:

Verifying formatting and mounting partition process.

Understanding the Linux File System

Choosing the right file system before formatting a storage disk is crucial. Each type of file system has different file size limitations or different operating system compatibility.

The most commonly used file systems are:

  • FAT32
  • NTFS
  • ext4

Their main features and differences are:

File SystemSupported File SizeCompatibilityIdeal Usage
FAT32up to 4 GBWindows, Mac, LinuxFor maximum compatibility
NTFS16 EiB – 1 KBWindows, Mac (read-only), most Linux distributionsFor internal drives and Windows system file
Ext416 GiB – 16 TiBWindows, Mac, Linux (requires extra drivers to access)For files larger than 4 GB

Note: Refer to our Introduction to Linux File System article to learn more about the evolution and features of different Linux file systems.

lunes, 6 de marzo de 2023

Create a Partition in Linux - A Step-by-Step Guide


Published on August 3, 2022


  • UNIX/Linux https://www.digitalocean.com/community/tutorials/create-a-partition-in-linux
Default avatar

By ninad

Create a Partition in  Linux - A Step-by-Step Guide

While we believe that this content benefits our community, we have not yet thoroughly reviewed it. If you have any suggestions for improvements, please let us know by clicking the “report an issue“ button at the bottom of the tutorial.

In this tutorial, we’ll be covering the steps to create a partition in Linux. This can help you allocate different memory regions for specific uses. Creating partitions can also help you install multiple operating systems on your machine and minimize the damage in case of disk corruption.

How to Create a Partition in Linux?

In this tutorial, we will utilize the fdisk command to create a disk partition. The fdisk utility is a text-based command-line utility for viewing and managing disk partitions on a Linux system.

Before we create a partition on our system, we need to list all the partitions on our system. This is essential as we need to choose a disk before we partition it.

To view all the partitions currently on your system, we use the following command.

sudo fdisk -l

You might be prompted to enter your password again to verify your sudo privileges. Here we called the fdisk command with the -l to list the partitions. You should get an output similar to the following.

Fdisk L
Fdisk List

Now, we choose one disk from this list to partition. For this tutorial, we will choose the disk. To create partitions, we use the ‘command mode’ of the fdisk command. To enter the command mode, we use this command in our terminal.

sudo fdisk [disk path]

If you see an output similar to this, you have successfully entered the command mode.

Partitioning A Disk
Partitioning A Disk

Using the command mode

Once we enter the command mode, many beginners might get confused due to the unfamiliar interface. The command mode of fdisk uses single character commands to specify the desired action for the system. You can get a list of available commands by pressing ‘m’, as shown below.

Fdisk M
Fdisk M

Creating a partition

Our main objective here is to create a partition. To create a new partition, we use the command ‘n’. This will prompt you to specify the type of partition which you wish to create.

If you wish to create a logical partition, choose ‘l’. Alternatively, you can choose ‘p’ for a primary partition. For this tutorial, we will create a primary partition.

Create Partition
Create Partition

Now, we will be asked to specify the starting sector for our new partition. Press ENTER to choose the first available free sector on your system. Next, you’ll be prompted to select the last sector for the partition.

Either press ENTER to use up all the available space after your first sector or specify the size for your partition.

Sector Type
Sector Type

As shown in the screenshot above, we chose to create a 10 MB partition for this demonstration. Here ‘M’ specifies the unit as megabytes. You can use ‘G’ for gigabytes.

If you don’t specify a unit, the unit will be assumed to be sectors. Hence +1024 will mean 1024 sectors from the starting sector.

Setting the partition type

Once we create a partition, Linux sets the default partition type as ‘Linux’. However, suppose we wish my partition type to be the ‘Linux LVM’ partition. To change the ID for our partition, we will use the command ‘t’.

Now, we get prompted to enter the HEX code for our desired partition ID. We don’t remember the HEX code for the partition types on top of our heads.

So we will take the help of the ‘L’ command to list all the HEX codes for the available partition types. This list should look as shown below.

Partition Type 1
Partition Type List

We see that the HEX code 8e is the partition ID for the ‘Linux LVM’ partition type. Hence, we will enter the required HEX code. The following output gives us the confirmation that our partition ID has been changed successfully.

Partition Code
Partition Code

Finalising the changes

Now that we have created a new partition and given it our desired partition ID, we need to confirm our changes. All the changes made until this point are saved in the memory, waiting to be written on our disk.

We use the command ‘p’ to see the detailed list of partitions for our current disk as seen in the screenshot below.

Create a Partition
List of all partitions

This allows us to confirm all the changes we have done to the disk before making them permanent. Once you have verified the changes, press ‘w’ to write the new partition on your disk.

If you don’t wish to permanently write your new partition to the disk, you can enter the command ‘q’. This will exit the fdisk command mode without saving any changes.

Formatting a partition

Once you create a new partition, it is advisable to format your new partition using the appropriate mkfs command.

This is because using a new partition without formatting it may cause issues in the future. To see the list of all available mkfs commands, we enter the following in our command line.

sudo mkfs

This gives us a list of available mkfs commands. If we wish to format a partition on our current disk with the ext4 file system, we use this command.

sudo mkfs.ext4 [partition path]

Mounting a virtual disk

$ dd if=/dev/zero of=imagefile bs=1M count=1024

$ mkfs.ext4 imagefile

$ mkdir mntpoint

$ sudo mount -o loop imagefile mntpoint


When you are done, unmount it with:

$ sudo umount mntpoint

. Mount it somewhere:
$ mkdir mntpoint
$ sudo mount -o loop imagefile mntpoin